Showing posts with label tutorial. Show all posts

Friday, March 15, 2013

Leather Hip Quiver

UPDATE:  Apparently this posted with me NOT having finishing all the text.  So sad.  You'd think after all this time I'd know how Blogger works.  That's what I get for trying to cram this in before an early morning meeting.  Anyway, here's the finished post.

A couple of weeks ago I posted about one of my first leather projects, an archery arm guard.  Since then, I've moved on to a much more complicated project, the Hip Quiver. Below is the step by step process, though it's not quite a tutorial, you'll get a good idea of what goes into making something like this.  Keep in mind, this is my third project.  There's bound to be a few mistakes that a more experienced leather-crafter may find, and if so, please feel free to point them out.  The biggest strides are made through your mistakes!
 

So, before we begin, let's take a quick look at my work station.  What you see here are some various tools and blades, tooling stamps, dyes, granite slab and hammer for tooling.  Most of this you'll see in use.

I cut the pattern from veg tanned leather.  The veg tanned leather is used for tooling and stamping.  The pattern itself was taken from a Tandy Leather design.


The first thing I did was 'case' the leather.  That's where you dampen the leather to make it pliable and soft for shaping and tooling.

 The leather soaks up the water and takes on a darker tone (left).  As the water soaks into the leather the tone comes back to it's natural state.


 With the leather cool to the touch it's ready to add the design.  With a pattern I created and a stylus I trace over the lines leaving an impression in the damp leather.


With the pattern 'impressed' into the leather, you polish your swivel knife...


...and begin cutting into the leather.  Working with the swivel knife take a bit of practice.  My initial attempts were pretty dismal but keeping at it, it didn't take too long to get the hang of working with the tool.  By long I mean cutting though a lot of leather scraps to get the control of the knife.


With the soft leather, the swivel knife just slides through it like butter.  I continued cutting though the initial impressions until I was satisfied.


 I next added some textured stamping around the borders.  Stamping is another element that takes a little while to get the hang of.  I thought I took pictures of the process but apparently I didn't.  You take a stamping tool, place it on the leather and give it a whack with the hammer.  With textures and bevels the trick is to get smooth transitions by 'walking' the tool as you hit it.  THAT took a while to get some control over. 


 With the cutting and stamping completed, I let the leather dry around a tube to give it the shape I needed.


Leather Hip Quiver
 The next step was to begin dying the leather.  I gave the quiver a natural brown coat the dyed the borders in black.  You'll notice I also punched some holes for the stitching as well as some decorative studs to be added later.

Some of the elements, such as the cut out owl and the vines had to be dyed using a brush.


 At this point I also created the belt loop with the same methods I mentioned above. All holes punched as well.
With all the dying finished, I applied a finishing coat.  I had a little problem with the  two layers of dye (black on brown) rubbing off so I'm not sure about how best to apply the dye in the manner I was going for.  This will need a little more research on my part.


I began adding the various pieces of hardware.


With all that completed, I began the process of stitching it all together.  The plan was to stitch the belt loop portion onto the quiver itself but I ran into some problems with that.  I don't have a picture of the mess that created, sorry about that. 


Leather Hip Quiver


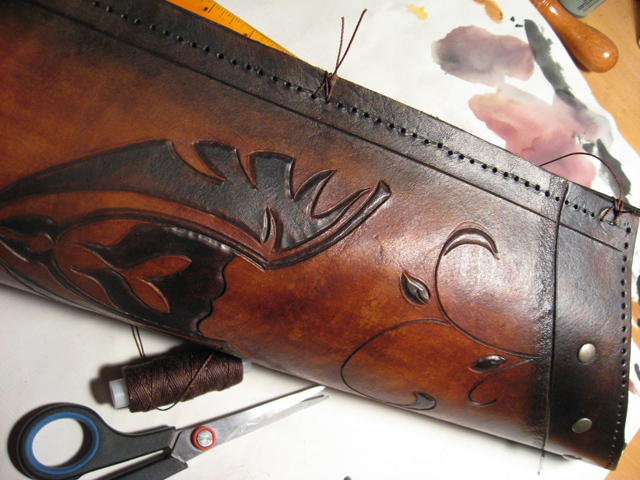
So I ended up using studs to connect the two pieces together.  So some of the stitching is more decorative and less functional than I had planned.  I'm still satisfied with going this route.


So finally I added the base with a small block of wood and a piece of leather, both of which I dyed the interior color (mahogany).


I then tacked the leather and wood base to the bottom of the quiver and that pretty much wrapped it up.

Below are the finished pictures.

Leather Hip Quiver

Leather Hip Quiver


Leather Hip Quiver


Final thoughts....

Overall I'm pretty happy with the way this turned out.  There are a few 'errors', if you want to call them that, with some of the stitching and I'll alter my technique on future projects.  That mostly involved tying off the threads.  The pattern itself turns out to be a bit bulky for my taste and I would end up 'slimming' this down if I were ever to make another hip quiver like this.  It was a pretty big project and took a bit longer that I had anticipated but a great learning process as well.  Though I'm happy with the way the dye job came out it's not  100% what I was going for. I'll have to do a little more research and experiments on adding multiple coats of different color dye -  maybe that's not the best way to do that, but we'll see.  I have some ideas on how to improve what I did here.

I'll be testing the quiver and arm guard out this weekend, putting it through actual use.

Monday, November 26, 2012

Wings Of War Custom Mat

One game I don't talk about much but really enjoy is Wings Of War, a card based World War I dogfight game distributed by Fantasy Flight Games. You have a plane printed on a playing card. Each turn you pick three maneuver cards as does your opponent(s), then reveal, move and then fire.  A fast paced war game with no dice involved at all.

But what really kicks the game up a notch is using the Wings of War plane minis.  The dogfights become quite amazing as the planes buzz around each other on the playing surface.

After spending some money collecting the planes, many of which are not in production any more (the game has since been picked up as Wings of Glory and new models are on their way), I felt that the battle mat was the next item.  However, looking to purchase or print one on my own would cost quite a bit more than I was intending to spend.

So what do we do here at the Warlock's Home Brew?  We makes our own!

Some research on-line brought me to this example and tutorial by Wombat

I loved his final product of the hand painted battle mat.  It looked easy enough so for only a few dollars ($9) and just a couple hours of my time I'd have myself a pretty classy Wings of War battle mat.

Instead of the thicker plastic based faux-grass material Wombat went with, I purchased some nicely colored wool for only $9.  This was very nice material and had some tooth to it which I felt would help with applying the acrylic paint.  I wanted a 40 inch by 50 inch piece of fabric but the widest this particular material came was 36 inches.  I ended up with 36" X 50" which ended up working just fine.

Based on the tutorial linked above I quickly drew in black the field patterns, roads and rivers.

Following Wombat's directions, I used a sponge and painted in some of the fields trying to stay as close to the outlines as possible. I used a brush for the roads.

I added No-Man's Land across the center of the fabric using layers of black, browns and reds.  At this stage I still have to add the craters and trenches but...

  
...as you can see it was quite usable as it.

So this holiday weekend we played a couple of games on the mat. It worked out great, and the game was fun (thought I got shot down all three games).  My wife, who had played the card version of the game and wasn't all that impressed enjoyed playing with the minis and actually requested to play the game again the next day - which we did and she proceeded to shoot me out of the sky again!

Looking forward to getting the group into playing some Wings of War in the near future.

Wednesday, December 8, 2010

More Cubes of a Gelatinous Nature

It seems that the new trend these days is creating your own Gelatinous Cube miniature. Seriously, just look around:

Society of Rope and Pole's Gelatinous Cube

The Cube from Dungeons and Digressions

And Carjacked Seraphim's Cube

So I'm a DIYer when it comes to my gaming material as some of you may know, so when I saw a way to make a cheap mini I jumped at it! A perfect project for a Sunday afternoon between watching some good ol' American Football action (Go Bears!).

So I went down that path using Michael Curtis' method with but a few minor changes.

I'll be using some basic acrylic art supplies (gesso and molding paste), paint, brushes and a wooden block. The wooden block was only $.99 a super bargain for any mini project! The rest of the material I already had around.

So I too started with a cubed block and chipped away the edges and corners with an Xacto knife then sanded those rough edges to soften the cube.


The next thing I did was break out the Acrylic Modeling Paste and using a pallet knife just started spreadin' that stuff all over the cube to give it an irregular shape. Michael used joint compound and you can get pretty much the same effect. I had this lying around so that's what I used. It's fun working with this material so have a blast!

Now our cube is starting to take form quite nicely.

After another quick coat of Gesso I begin painting it. Now I'm partial to the purple cube myself though many others like green. So I started with by base purple coat.


From there I just added layers of greens, yellows and blues and then finally a lite wash of purple again. Then some edging highlights with a dry-brushed metallic silver. Finally finished it up with a gloss varnish.

And behold! A hungry scavenging cube ready for it's next victims!

Here's a couple more Cube DIYers

Thiel a Vision

Kev's Lounge

And for those of you who prefer your cubes clear....

Fake Ice Cubes

I may try this method next:
Clear Cube Tutorial

Tuesday, December 22, 2009

Campaign Creation: Map Making Tutorial Part 4

Okay, so now after all the hard work from the last 3 tutorials (part 1, part 2, part 3), the real fun begins. We're going to add the final touches to your map to really spark your players imaginations. Once again, we'll be using GIMP, the free open source image manipulation application to wrap-up our map project. If you have access to Adobe Photoshop, you can use that app as well. The methods and techniques will be very similar.

In tutorial 3, we went over a number of GIMP's features that helped you enhance your hand drawn map. We'll be using some of them for the final portions of the map. I'll cover some in this lesson but you may want to go over those techniques in lesson 3 if you haven't already.

The first thing that you want to do is open your flattened map file that you created in lesson 3 into GIMP. This flattened file will include all the text and the hand drawn, inked map background all on a single layer.

In your layers pallet, you will want to change the name of the layer from Background to Map. This way, we can add layers beneath the map layer as well as above if need be.

The next thing you want to do is to change the mode of the map file from Grayscale to RGB. To do that, go to Image >> Mode >> then select RGB. Your map is now ready to accept color information.

You are now going to add the paper texture background to your map. Download the image file to the right by clicking on the image so it opens on it's own, then right-clicking select Save Image As... and save the image to your desktop. Open that image in GIMP. Copy the image and paste it into the map file. When you paste it into your map file you won't see it right away but a new layer will be created called "Floating Selection (Pasted Layer)". Double click on that layer name and rename it 'Paper Background'. You should now see the paper texture. You can resize and position the paper using the scale tool, rotate tool and the move tool as needed.

After you have scaled and positioned the paper texture to fill the map area you want to move the Paper Background layer below the map layer. Now select the map layer and under the Mode drop-down menu select Multiply. You will now see your map drawing on top of the texture paper background. Already things are looking pretty good, right?

We're going to add a little color to the map to give it a hand painted appearance. Each color element will be on it's own layer. We'll start with the coastline. I like to add the color of water along the coast and lake shores. Select the Airbrush tool, then choose a fill color from the color pallet. Create a new layer and call it Coast and place it below the Map layer but above the Paper Background layer. With the Coast layer selected, choose Multiply from the Mode Drop-down menu once again. Now adjust the brush scale and begin painting along the coastline. I like to paint just the area of the ripples that I drew along the coast. You're painting doesn't have to be perfect, in fact, the more loose you are with it, the more handmade it looks. Using the Airbursh tool in this way can give a nice watercolor look to the colors you add to the map. You'll also notice that the texture of the background paper shows through the color as well when you have the layer mode set to Multiply.

Keep working your coastline and don't forget your river inlets, islands and lakes, altering the brush scale as needed.

Now, repeat this technique with other color elements such as forest or jungle, mountains and hills, whatever your imagination comes up with. I use the paper texture background as the general color of the land masses and just add color highlights. For example, at this scale, I didn't add any forests or jungles by hand, but instead I will add the colors to represent those areas. Again, I may have to adjust the opacity of a layer to get the right effect.

For the mountains, I use a gray tone and fill the shadowed area on the left side. Remember things don't have to be perfect, in fact the less perfect they are the better. It gives it that hand painted quality. Also note that all the colors are below the black outlines of the map. Those black outlines will cover any odd coloring 'out of the line' marks that you make.

Color in any other details that you've added to your map and with a little work, you can have a great prop to hand to your players. Below is my completed copy of the campaign world map.

Now, at this scale I get a pretty broad view of the lands, but my campaign is beginning in the Region of Eir'ian. So I followed the same techniques in these tutorials and created a detailed map of just that area.
You may notice that in this scale, I added 'trees' for the forested areas and additional towns and labeled areas of interest. This was going to be the map that I hand to my players but after a couple of sessions I realized that these level 1 grunts weren't going to need all this land to explore for quite a while so I 'zoomed' in a bit more and created this map:
This represents a tighter area of exploration that my players may actually get to. I focused more on the details of the smaller scale, again adding more areas of interest, towns and ruins. This is the main focus of my sandbox campaign but if I need to expand it then I have a general idea of what is out there. That is my argument for a top-down approach to map making/world building/campaign construction. All of these later maps were created using the same methods that I explained in these 4 posted tutorials.

I hope you found some of these hints and methods useful and I hope you use them in your creative campaign endeavors!

Start over with Part 1