Part 1 and
Part 2 of the tutorial can be found here.
For part 3 of our tutorial, we're going to deal with adding text labels to your
map.
There are two ways to do this, one is by hand and the second is with your trusty computer. I prefer to add the text using the computer as I found that my hand written text, no matter how hard I try, is rough and wild (and in a not so good way). Creating real nice stylized text by hand is an art in an of itself. I'll touch on letting by hand in a future post, but for now, I am going to focus on using the computer to add text to your map. Please note that I am not affiliated with any of the products or websites that I mention in these tutorials. These are the tools that I have found work best for me. You, of course, can use whatever resources that you have access to.
For this portion of the tutorial and the next we will be using the computer to add text to your map. You will need access to a computer (of course), a scanner and a computer application that will allow you to add text to your map. If you have Adobe Photoshop (PS), you can use that as your application, if not,
GIMP is a free open source image manipulation application that does much of what Adobe Photoshop can do. It's a very good substitute for Photoshop and did I mention it's free? So if you need to,
go get GIMP now. I will be using GIMP in this portion of the tutorial but the methods that I'll be talking about can be applied in both Photoshop and GIMP. You can also use Adobe Illustrator for the text manipulations if you have that.
A note on GIMP: I understand that if you haven't used an image editing application before that there can be a bit of a learning curve. There are many good
GIMP Tutorials out there to help you get started (http://www.gimp.org/tutorials/) so I won't be going into details here on some of the basics.
This is not a tutorial on how to use GIMP. I will, however, show you the techniques that you can use with your map. I understand that it can be frustrating if you are new to this but just be patient and keep at it. You'll gain a bit more knowledge each time you work with it.
The first thing that you want to do is find some good fonts. Don't use the standard fonts that come with your computer. There's nothing there that is too interesting for a fantasy map. I would suggest that you go here:
www.1001freefonts.com . Here you will find free fonts for both Mac and PC. Look around, find some interesting ones and download them. You can install the fonts based on your computer OS instructions.
The next thing that you want to do is scan your map into your computer. Be sure that you have set your scanner to
300 dpi (dots per inch). This is a good resolution for printing out your map. If you are worried about file size you can scan your work at 150 dpi. If you scan at 72 dpi, when you go to print out your map it will look all jagged and bitmapped. Also you will only need to scan this in as a
greyscale image. It will keep the file size down and make it easier to work with. We'll be adding color much later in the process in Part 4 of this series. Your scanning software user interface will have most of these options for you to choose from.
You can use GIMP or PS to scan your file directly into those applications.
In PS go to File >> Import >> you should see your scanner in the list.
In GIMP go to File >> Acquire >> Scanner/Camera >> you should see a list with your scanner.
If you have already scanned and saved your image file you will have to open it in your application. To do this, go to File >> Open >> then browse to your image file and select to open.
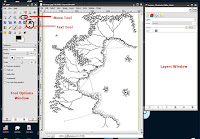
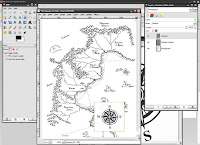
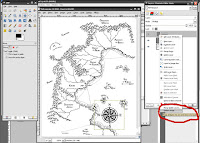
You should now have your map opened up in GIMP. The image below will illustrate out some of the items that we will be talking about.
Another note about these image applications programs; all the different elements are added on different layers. You will be doing this for each text item or map element that you add. Yes, it will add to the file size, but in the end you will 'flatten' all the layers into just one single layer.
Also, remember to save your work frequently. We're in the 21st century now and I'm sure all of us knows what happens when you don't save your work!
So let's get busy, shall we?
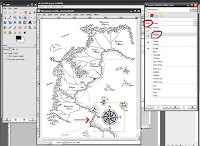
Click on the
Text Tool in the tools pallet. If you click on your map a small window will pop up. Type the text that you want to display in the window. You will see it appear on the map. In the
Options Pallet, select the font and size that you want. After you have made your selection, click
Close. You'll notice in the layers pallet that the text has now created it's own layer above the map background layer. If you don't see your layers, click on the drop-down menu at the top of the layers window.
If you need to move the text to a different place on the map, select the
Move Tool. In the
Options Pallet, select
'Move the active layer'. Select the layer with the text that you want to move and use the Move Tool to move it to a new position on the map.
Now, use this method over and over again, adding new text to your maps. A good method is to make the first letter of the word a larger sized font. Unfortunately, in GIMP, this has to be done on a separate layer which might get a little unwieldy. There may be an easier way to do this in GIMP but I haven't found it yet. You will not have that problem if using Photoshop.
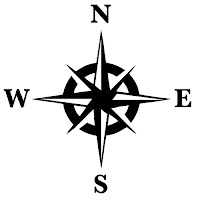
Now, there's one other thing that I will show you here. You can add additional elements, such as a compass, to you map. You can find one online, scan one in or you can
download and use this one I created. Remember, if you look for one online, be sure that it is of a high enough resolution for your map to print properly. To download the compass image, click on the image to the right, when it opens in the window,
right click and
save image.
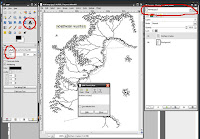
Open this Compass file in GIMP (or PS). Then go to 'Select" >> All >> then copy (Edit >> Copy) the image and paste (Edit >> Paste) it into your map file. You won't see it right away but a
new layer will be created called
"Floating Selection (Pasted Layer)". Double click on that layer name and rename it 'Compass'. You can resize and position the compass using the scale tool and the move tool as needed.
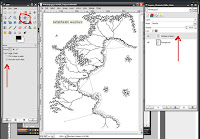
You may notice that the white space around the compass image may be covering up some of your map. What you want to do here is be sure that you have selected the compass layer in the layer window, in the
Mode drop down menu, select
'Multiply'. You will notice that the white background will disappear leaving only the black of the image exposed. We will be using this technique a bit more in lesson 4.
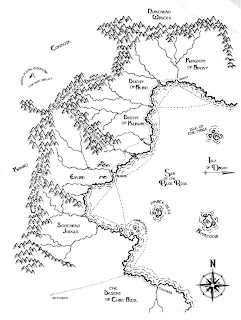
At this map scale, I add dots or squares for cities and ruins.
Now, you map should be looking pretty good. Be sure you have a version of this file saved. Now you will flatten all the layers into one. Do this by right clicking on one of the layers and selecting
'Flatten Image'.
Save this version of the file under a different name so that you have both versions to work from just in case you need to alter your layers once again.
This is a very brief lesson using GIMP to add text to your hand drawn map. I understand that this might be a lot of information but I hope this can get you started with using an image manipulation application to alter your maps. Just be patient and keep working at it.
 In the next tutorial
, we will be adding color and texture to give your map an old, worn look.
On to Part 4


